Manufacturing Process & Factory and Equipment Planning
Globmarble offers cultured marble and
artificial stone molds, formulas and complete factory training to get youstarted in the
cultured stone and marble manufacturing.The manufacturing process therelatively simple, capital investment islow and row material prices represent only a small percentage of the expectedretail price.
To assist you in understanding this industry, a few of the basic raw materials for our ten basic formulas are as follows:-Polyester Resin (casting)- Ground Calcium Carbonate Filler (marble dust orlimestone in aggregate sizes from 20 to 200mesh or grit)- Peroxide Catalyst (MEKP)- Titanium Dioxide Pigment (awhitening agent)- Assorted Paint Pigments (dry orwet)- Gel Coat (A type of material used in fiberglassmanufacturing) With Glob Marble seventy to eighty percent ofthe raw materials used is calcium-based filler (marblepowder or ground limestone). Twenty to thirty percent of thematerials are resins, coating, pigments and waxes, all ofwhich are produced in the industrially developed countries, andare readily available in most every country worldwide.Limestone or marble fillers have an infinite shelf life and can bepurchased from rock quarries and companies that grindgravel and other stones for roads and cement. Actually, the filleryou need is their waste material. In Florida,limestone costs $150 per ton. In California, about $100 per ton or 5 centsper pound. Yet in some countries overseas wehave seen it as low as $40 per ton or 2 cents per pound. It really does notmatter, as a ton of limestone will produce atremendous amount of cultured marble.Important! Color of limestone or rockfiller can vary from medium gray or brown toalmost white. We will train you how to whiten any color. However, yourfiller must be dry, not wet. Size of ground rockor limestone can vary from 20 mesh (or grit) to 200 mesh or grit.Globmarble Inc. will assist you in designing aspecific floor plan for your building to help create the most efficientoperation possible.The recommended manufacturingspace varies per mold package The in-factory training program, has beenthoroughly developed to help you utilize laborand equipment to maximize total production efficiently. Utilizing space tofit your mold package will help keep yourmanufacturing operation highly efficient and profitable. Here are a fewconsiderations in reference to the choice of afactory building and site:
- The factory building ideally should have a concrete or wooden floor with good ventilation and approximately an 8 foot (or higher) ceiling.
- Electric outlets (220 - 110 Standard) should be available as the factory will be using a 10hp to 25hp air compressor as well as one or two blenders, a mixer, and a miscellaneous assortment of small power tools.
- A loading door and ramp is nice, but not essential.
- An office and planning room. Most factories call their display room a “planning room". Your contractor or architect clients will often send their customers to your "planning room" to view various colors, samples, & installations they may plan for their home, condominium, or apartment building.
- Factory production equipment and raw material storage should be on a single level. Very few factories have two stories unless they have an elevator.
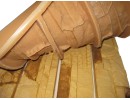
- No water is required in the manufacturing process of cultured marble, Onyx products; however, you will need water for bathrooms, coffee rooms, etc.
Installation of equipment is simple. Layouts included in your in-factory training program and training manualswilldetail the placement of equipment, molds, and supplies to assure you of a free-flowing andefficientoperation.
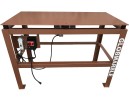
Equipment used in most plants are as follows:- Compressor - 5 HP for smalleroperations, 10HP to 20 HP for large plants (new or used);- Spray Gun;- Standard Grinder;- Standard Sander/Polisher;-Platform Scale;-5 ½ to 10 Cubic Ft. Cement Mixer 15 Cubic Ft. utilized in large plant operations. A blender with twobuckets can beeffectively utilized as a mixer in smaller operations;- Marble Blender - designed to create dramaticveining whilemixing marble or Onyx;- Skill Saw;- Jig Saw;- Carbide Blades;- Squares and Miscellaneous Hand Tools;-MiscellaneousProduction Tables (Diagrams for vibrating tables, etc. are included in the training manual furnished witheach moldpackage.);You can view the factory layout above with a brief description of the cultured marble manufacturingequipmentinvolved to build an efficient manufacturing system. The equipment includes roller track / conveyor lines isdesigned tosave space and move your molds through the proper sequence to maximize production. We are numbered themanufacturingsteps in the drawing as well as in the description. Every factory building requirements are different, souse this onlyas a general guideline and keep in mind that your factory will be laid out and tailored to fit your needsandrequirements.
Cultured Marble Manufacturing Equipment Layout

 Download Drawing in PDF
Manufacturing Equipment Package Include:
- Conveyor, Mold Set-up w/ Shelf- Conveyor Mold Set-up- >Tilt/Rotate Gelcoat Cart- Gel coat Spray booth-PneumaticSpray Booth Door- Solvent Wash tank- Gel coat Stray System- Conveyor, Gel coat Cure- Standard Exchange Cart-VibrationTable- Vibration Table- 350# Blender- 350# Mixing Pot- Mixing Pot Washtub- Cart Track- Conveyor, Product Cure-StandardExchange Cart- Cart Track- Conveyor, Product Demolding- Conveyor, Product Demolding- Standard, Exchange Cart-Conveyor,finishing Line with Shelf- Conveyor, finishing Line with Shelf
Explanations:
- Set up lines (1-2): This factory layout has two Set up Lines. The shelf will hold miscellaneous molds, tools and waxes and other set-up supplies.
- After the molds are set up and waxed, you will transfer the mold to the Tilt Spray Cart (3) and into the Spray Booth (7) where the gel coat will be applied with the Gel Coat Spray System.
- There are two types of gel coat spray carts. Shown is the Tilt/Rotate Gel Coat Spray Cart. This unit speeds up the gel coat process by elevating and rotating molds a full 360° in one mode, and lifting them to a 30° angle in another mode. This mobility allows the spray gun operator to stand on one side of the cart throughout the entire spraying process. There is also a gel coat spray cart available without the tilt and rotate option.
- The solvent wash tank (6) is in the gel coat area (4). You will need to clean your gel coat spray gun to keep it spraying efficiently.
- After the mold has been gel coated, the gel coat will need to cure for a time prior to pouring it. Your gel coat curing time will vary depending on the brand of gel coat, the type of catalyst (hardener) the temperature. The Gel coat Curing Heat Tunnel system (8) is an excellent way to accelerate the cure time for gel coated molds. Utilizing a heater and blower to move warm air across the surface of molds curing times can be cut by more than 50%, while at the same time enabling a better, more durable cure. In cold climates, I highly recommend a gel coat heat tunnel in this area.
- Once your gel coat is cured, it will be moved to the vibrating table (10-11) using the Transfer Cart to be poured on. The cultured marble, onyx, or granite matrix is mixed in the blender (12) and poured on the mold while the vibrator on the vibrating table is turned on.
- Once the mold is filled, you will move the full mold to the single level Mold Storage Rack or a multi level storage rack can be up to five levels high which obviously stores five times more molds in the same amount of space. Recognizing that floor space is costly, our engineers designed single and double wide mold storage lines that can rise as high as ten feet in the air and extend to any length. This configuration can provide up to five levels or more of space-saving Mold Storage Lines. If a single level storage rack is used a simple transfer cart may be used, but if you have multi-level storage racks or expect to add additional levels to your storage racks, you may want to consider the Transfer Lift / Scissor Lift in the beginning.
- When your cultured marble parts are sufficiently cured, you will roll them to the demold (22-23) storage area, which is a working area to remove your finished parts from the mold and to prepare the molds for the setup line.
Solid surface manufacturing equipment is also available